How to Successfully Assemble a Circuit Board for Beginners and Experts
The process of circuit board assembly is a critical step in the production of electronic devices, bridging the gap between design and functionality. As technology continues to evolve, both beginners and experts alike face the challenge of mastering the intricacies of this essential skill. Renowned expert in the field, Dr. Emily Chen, once stated, "The art of circuit board assembly lies not only in the technical skills but also in the understanding of how each component interconnects to create a cohesive system." Her insight underscores the importance of not just following instructions but comprehending the underlying principles that govern electronic assembly.
In understanding the complexities involved in circuit board assembly, one must recognize that it requires a blend of precision, patience, and practice. This guide aims to demystify the assembly process, equipping enthusiasts with the knowledge needed to successfully navigate both simple and sophisticated projects. Whether you are embarking on your first assembly or refining your skills, grasping the fundamentals will set the stage for successful outcomes in the ever-evolving landscape of electronic manufacturing. Join us as we delve into the essential techniques and tips that will empower you in your journey through the world of circuit board assembly.

Essential Tools and Materials for Circuit Board Assembly
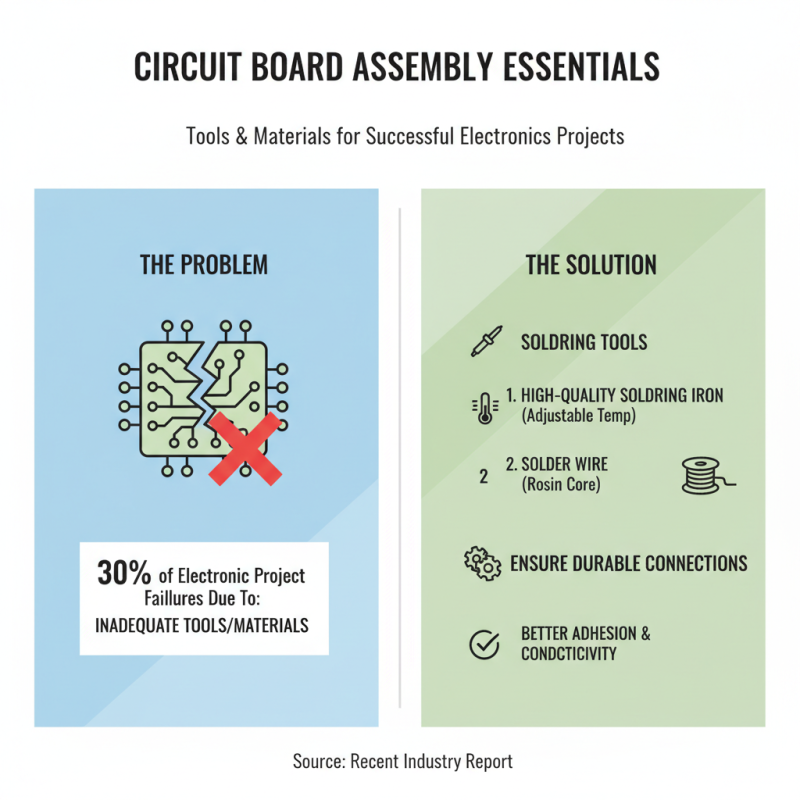
Assembling a circuit board requires a comprehensive understanding of the essential tools and materials that facilitate successful construction, regardless of skill level. A recent industry report highlighted that approximately 30% of electronic project failures can be attributed to inadequate tools or materials, underscoring the importance of proper preparation. At the forefront of the assembly process, soldering tools are indispensable. A high-quality soldering iron, with adjustable temperature settings, allows for precise application and minimizes the risk of damage to sensitive components. Additionally, solder wire, particularly those with a rosin core, ensures better adhesion and conductivity, vital for creating durable connections.
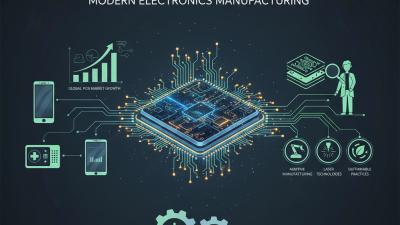
Moreover, the choice of materials plays a crucial role in the assembly process. Printed circuit boards (PCBs) are typically made of fiberglass or other laminated materials, which provide the necessary rigidity and insulation for electronic components. According to market forecasts, the global PCB market is expected to reach $80 billion by 2026, driven by advancements in technology and increasing demand for compact electronic devices. Furthermore, using high-quality components such as resistors, capacitors, and integrated circuits can significantly improve the performance and reliability of the finished circuit board. Ultimately, investing in the right tools and materials not only enhances the assembly experience but also leads to higher-quality outcomes in both beginner and expert projects.
Understanding Circuit Board Design and Layout Basics
Understanding the fundamentals of circuit board design and layout is crucial for both beginners and seasoned engineers. A well-designed circuit board not only ensures functionality but also enhances manufacturability and reliability. Start by establishing a clear schematic that outlines all components and their connections.
This visual representation serves as a roadmap for your layout and helps prevent common mistakes that can arise during assembly.
Tips: Always double-check your connections in the schematic against the layout. A small error in the placement or naming of connections can lead to significant issues during prototyping. Additionally, consider using software tools designed for circuit board design; these can help automate some aspects of the layout process and ensure your design adheres to industry standards.
While laying out the components, pay attention to their arrangement. Components that frequently interact should be placed close together to minimize trace lengths, which can help reduce noise and improve performance. Don't forget to leave adequate space for traces, vias, and mounting holes. Proper placement not only aids in signal integrity but also facilitates easier soldering during assembly.
Tips: Use ground planes and follow good routing practices to create a more efficient layout. Ensure that the power and ground traces are wide enough to handle the current without overheating. These best practices will contribute significantly to the long-term reliability of your circuit board.
Step-by-Step Guide to Component Assembly
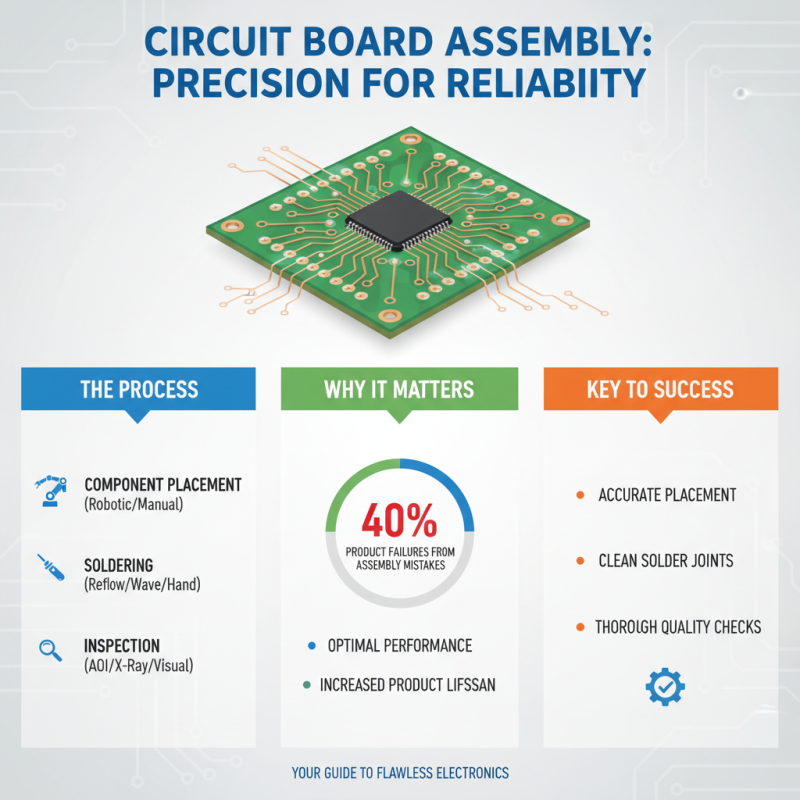
Assembling a circuit board can be a rewarding endeavor, whether you're a novice or a seasoned expert. This step-by-step guide focuses on the critical aspects of component assembly, which is vital to the overall function and reliability of the circuit. According to industry reports, nearly 40% of product failures can be traced back to assembly mistakes. Therefore, ensuring precision in this phase is crucial for optimal performance.
When starting your assembly process, it’s important to first organize your workspace and components effectively. Ensure that all parts are within reach and categorized. Additionally, utilizing tools such as a magnifying glass or microscope can significantly enhance accuracy during placement. **Tip:** Always check the component orientation, especially for polarized parts like capacitors and diodes. Incorrect placement can lead to circuit malfunctions or even component damage.
Next, soldering is an essential step in securing the components. A clean iron tip and proper solder can make all the difference. As noted in a recent study, well-soldered connections can improve the lifespan of a circuit board by up to 50%. **Tip:** Practice on scrap pieces before working on your actual board to perfect your technique. This step will not only improve your skill but also give you confidence as you move forward with your assembly project.
Soldering Techniques for Reliable Connections
Soldering is a fundamental skill for both beginners and experts looking to create reliable connections in circuit board assembly. According to industry standards, a well-executed solder joint should have a smooth, shiny surface and a concave shape, providing both electrical conductivity and mechanical strength. Research from the IPC (Institute for Printed Circuits) indicates that nearly 60% of electronic assembly failures are related to inadequate solder joints. This statistic emphasizes the importance of mastering soldering techniques to ensure the longevity and reliability of electronic devices.
For successful soldering, it is crucial to choose the right solder type, which typically comes in rosin core or lead-free formulations, catering to different project requirements. The application of heat should be consistent; temperatures must ideally stay around 350°C for most leaded solders, while lead-free solders require slightly higher temperatures of about 370-400°C. Environmental factors such as humidity can also impact solder quality, potentially leading to issues such as solder splatter or oxidation.
A study published by the Journal of Electronic Materials highlights that soldering in environments with less than 40% humidity significantly reduces the risk of these errors. Hence, consistent practice and attention to environmental conditions are paramount for both novices and seasoned assemblers in achieving robust solder joints in circuit board assembly.
Testing and Troubleshooting Your Assembled Circuit Board
Testing and troubleshooting an assembled circuit board are critical steps in the development process, ensuring that the final product meets both functionality and reliability standards. According to a report published by the Electronics Industry Association, over 30% of circuit board failures can be attributed to assembly errors, such as soldering defects or incorrect component placement. This statistic highlights the importance of meticulous testing during the assembly process. Basic testing methods include visual inspections, continuity tests, and power-on tests, all designed to identify potential issues early, saving both time and resources.
When troubleshooting an assembled circuit board, employing systematic techniques like the use of oscilloscopes and multimeters can reveal underlying problems. A recent survey conducted by the International Society of Automation found that nearly 70% of engineers rely on digital tools for troubleshooting, which allows for more precise diagnostics than traditional methods. Moreover, documenting the testing and troubleshooting processes creates valuable records that not only assist in resolving current issues but also serve as references for future projects. By emphasizing diligent testing and systematic troubleshooting, both beginners and experts can enhance their understanding of circuit behavior and improve the overall quality of their electronic designs.